Finger isolation exercises are a staple when it comes to guitar practice, especially here at The Guitar Gym.
These exercises are best used as a regular drill or warm-up. The primary benefits of these exercises are:
Increased coordination and brain/hand communication
After doing these exercises every day for a few weeks, you will notice a significant change in the responsiveness of your fingers. This applies to chord shapes, difficult phrases, playing speed and muscle memory improvements.
Improved flexibility and functionality
Flexibility is the main inhibitor of what is or isn’t possible on the guitar, by doing these exercises you will expand your ability to play difficult chord shapes and melodic runs that span over several frets.
The exercises featured in this video are a more challenging take on the traditional finger per fret exercise. If you are reading this article, you are likely looking for the best improvement for your time spent with your guitar.
I would like to invite you to take part in a two-week finger per fret program with me and see the results for yourself.
I have listed below a set of instructions/guidelines to follow in order to get the most out of this two-week challenge, but also generally in your practice.
First, watch the video above
Download the Tab for the exercises
Set a timer for five minutes, go through the exercises in the tab until the timer runs out
Do this two times a day for two weeks
For those with Guitar Pro, feel free to start at 50% speed and advance each day over the two-weeks
For those without Guitar Pro, start slowly at your own discretion and only speed up when comfortable
Remember, the goal is to control each finger as it moves, playing this fast is NOT the goal but will help with improvement
Make sure you play non-stop for the entire five minutes – it will feel like a long time while you are doing the exercise
A scale permutation (sometimes called a “sequence”) is one of several possible ways in which a scale can be ordered or arranged.
Before applying a permutation to a scale, you first have to learn your scale well enough and be able to play all the right notes and be creative enough to play the correct notes in various patterns/shapes/arrangements.
I find the easiest way to think about permutations is to separate them into two categories, Grouping and Skipping. While in the Scale Permutations video we only touched on one example of each of these types, the combinations are in fact limitless. If you truly want to go deeper into learning and discovering all the wonderful ways to play a scale that you can possibly imagine, then I recommend you try the following:
Learn groupings of 3, 4, 5, 6, 7 and 8 throughout a scale of your choice, if you have nowhere to start on this, you can use the G major scale shown in the Scale Permutations video, then learn interval skipping permutations of a 3rd, 4th, 5th, 6th, 7th and 8th.
Let’s assume you can do all of these options relatively fluently. The real magic begins when you start to combine these options together. I’ve listed below a few ideas and filters you can use when experimenting with these permutations, remember you are only limited in this exercise by your own creativity and flexibility.
Pick a grouping and play ascending, then a different grouping for descending and vice versa, there are approximately 15 different combinations available here in total. You can do the same with skipping.
Try alternating between skipping and grouping in the same phrase. Skip ascending and group descending, try this with the same number at first and then start changing the number of notes in your groupings and skips.
Learn a scale on one string and try these same exercises on one string. This will improve your skill of position shifting and lead you towards areas of the fretboard you may never have played in.
The first article in Brandon’s series “The Improviser’s Dilemma“
It’s a very common occurrence for guitar players to find themselves at a standstill with their current level of playing, whether it be linear, chordal or otherwise. You might find yourself unable to move forward because of a self-made belief that you need to learn more music theory or that the knowledge you currently have is boring and old. A good way to get around this feeling is by looking at the bits and bobs you do have and reimagining them through permutation and restrictive practices. At the end of the day, music is meant to feel good and enrich the creative parts of your being and the following examples can help you get back on track to a healthy and loving relationship with your instrument.
Improvising With The Pentatonic Scale
The pentatonic scale is an essential foundation to most, if not all, guitar players when they want to start improvising. After learning a few pentatonic shapes and boxes, most guitarists are thrilled with the idea of using them in a jam, whether it be jazzy, bluesy etc.
Fig. AA minor pentatonic scale
Figure A is a simple pentatonic box in the key of A minor, ascending then descending. After your fingers gain the necessary muscle memory to ascend and descend this shape, you might start experimenting with adding some bends, slides and other guitar-centric techniques for expressive embellishment purposes. But then what? What happens after you’ve resigned to the idea that pentatonic scales just aren’t doing it for you anymore? After you’ve exhausted yourself with pentatonics for a while, you might be thinking “this isn’t very interesting” or “man, my pentatonic scales sound boring” and, as the great B.B King said, “the thrill is gone.”
One thing you can do to make the pentatonic scale feel fresh is changing the way you would sequence it through permutation. Read on for a fresh perspective towards approaching your pentatonic scale!
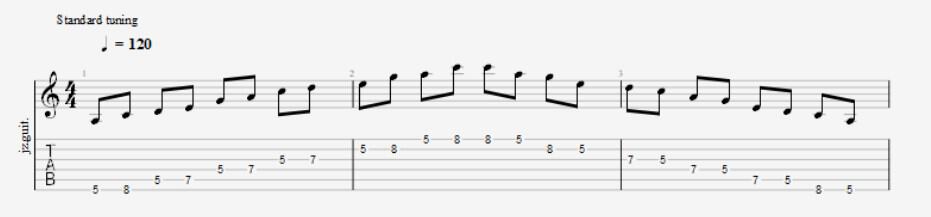
Permutation Of The Pentatonic Scale Using String Skipping
A cool way to spice up your pentatonic shapes is by using string skipping. You can access sounds that are more angular through larger intervallic leaps made through this technique. Figure B is a simple example of this, playing the 6th and 4th string ( E+D), 5th and 3rd (A+G) 4th and 2nd (D+B) and 3rd and 1st (G+E). Doing these exercises ascending and descending can help to solidify this new way of playing pentatonics:
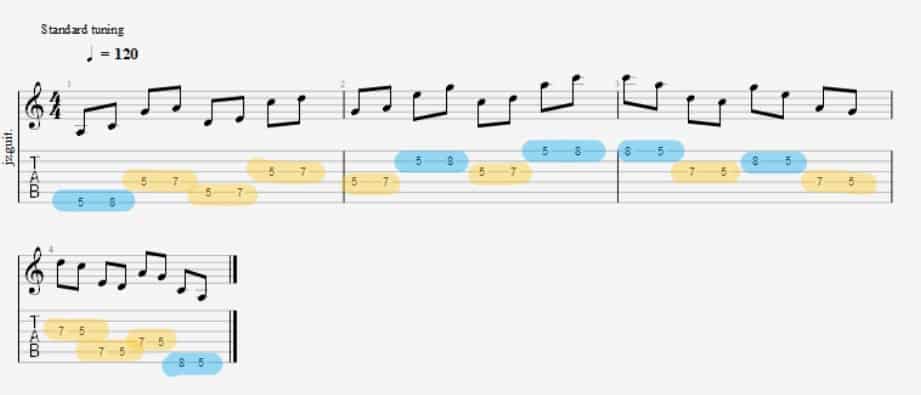
Fig. BExample of string skipping through the pentatonic scale. Parts that use frets 5 and 8 (minor 3rd interval) are highlighted with blue, those which use 5 and 7 (Major 2nd interval) are highlighted yellow.
After you’ve familiarised yourself with this idea, you can start experimenting with the string skipping and coming up with your own patterns. Each string has their own fragment of the scale. The E strings and B play the wider intervallic fragments (minor 3rd), playing from the 5th fret to the 8th and vice versa. The remaining strings A, D, G play between the 5th and 7th frets (Major 2nd interval). You can easily think about these different parts as two different types of cells that make up the scale as a whole, as colour highlighted in Figure B.
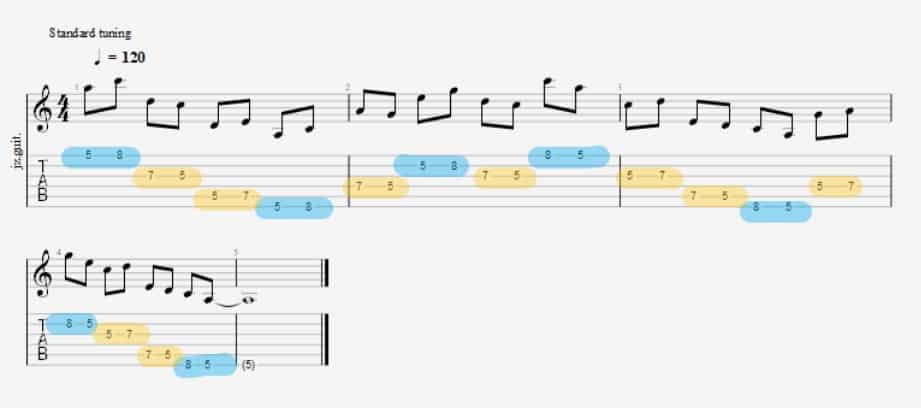
Figure C shows an example you can mix up the string skipping exercise by playing a mix of ascending and descending intervals on different strings:
Fig. C Example pentatonic scale using string skippingpermutations
Now it’s time to hit the practice room and come up with some of your own string skipping permutations! In the next chapter of The Improviser’s Dilemma, we’ll show you how to make a simple 3 or 4 note line into endless linear materials for you to freshen up your improvisation vocabulary. Happy playing!
Thanks for reading. If you are interested in improving your improvisation, or your guitar playing in general, we’d love to help! Why not book a no obligation, free trial guitar lesson and see what our guitar lessons are like?
Dynamic control is a crucial skill for guitar players to possess, but it can often be overlooked. Dynamics refers to how loud or soft notes are played, but there can be much more to it than that. Strong dynamic control will allow you to have more engaging performances, and elevate the quality of the songs you play to a whole new level. Here’s some examples of things to think about when implementing dynamics.
Dynamic control is a crucial skill for guitar players
Loud And Soft
The concept of loud and soft is fairly self explanatory, but how do you do it, and how do you implement it? A good exercise to start with, is to take a single note, and play it as softly as you can. To do this, gently brush the tip of your pick across the string. Then, start to gradually play louder, by more aggressively picking, and catching more of the string with your pick. Practice going louder and than softer again until you feel comfortable and in control. From there you can start to implement the same exercise but with chord strumming. If you play an electric guitar, you can use the volume knob on your guitar, and adjusting it between sections to change dynamics in conjunction with your picking technique.
Now that you have control over dynamics it’s time to start implementing that control. Typically dynamics are used to help differentiate different sections within a song.
E.g. Verse: soft, Chorus: Loud, Final Chorus: VERY LOUD.
Try experimenting with this in the next song you learn.
Leave Yourself Room
Always consider what comes next and where the song needs to go in relation to dynamics. If you start playing super loud right from the first verse of the song then you will have no room to raise the dynamics in the chorus. You can only ever play so loud. There is a point where you can’t strum harder, amp wont go louder or you start to drown out the rest of your band. Save that point for the climax of the song, but how do you do that?
Try pulling out a pen and paper, and writing out the structure of the song. Figure out what section in that structure you want to be the climax, and play that first, as loud as you can. From there work in reverse through the loudest to softest sections. This will ensure you never run out of headroom.
Leave Room For Your Bandmates
Listen to the rest of the band while your playing, take note of how loud or soft they are playing, and to play accordingly. This is especially important if you are new to the concept of dynamics and unsure of where to use what volume.
E.g. You are playing rhythm guitar in a song with a band and another guitarist is taking a solo. You should in this case play relatively softly, so that the solo guitarist can be heard.
Leaving room like this for your fellow musicians will make the music sound much better and also shows great respect. Nobody likes being played over the top of. Showing this kind of courtesy will encourage people to want to continue to play with you, and to do the same for you when it’s your turn to take the lead.
Don’t Be Afraid To Stop Playing
Dynamics isn’t just about your own playing, it’s about the whole band and what’s best for the song. Sometimes what’s best, can be to play nothing at all! By not playing anything in some sections of the song, the parts you do play have far more impact.
E.g. You are playing in a band and a song you’re working on is sounding the same right the way through with few differences between section. You could try dropping out all together in one of the verses and come back in loud and strong in the chorus.
The audience is more likely to take notice of, and appreciate your great guitar playing if it’s taken away in some sections, and the brought back again.
As you have probably figured out, dynamics comes largely from a mindset, rather than from practicing a technique. That means that you can improve your playing using dynamics, just by thinking about dynamics. If every time you’re practicing, rehearsing or performing you consider dynamics, you’ll start to develop far more interesting music than you have before. The key things to remember with all of these factors, is to maintain a balance between soft and loud. Without one you cannot have the other.
Interested in guitar lessons? We’d love to help! Get in touch today.
[button label=”Book your FREE LESSON” url=”https://guitargym.com.au/request-a-free-lesson” color=”#e21836″ target=”_self”]
Metronome practice is one of the most effective methods for improving your playing quickly, especially for technical, high tempo pieces. Unfortunately, for many of us it can also be a tedious way to practice and as a result is often overlooked or not done properly. Use these tips to maximise your metronome practice so you can spend less time with a metronome and more playing the fun stuff.
Go Slow To Go Fast
Learning songs at a very slow tempo is likely something that has been relentlessly drilled into you already, its especially important for metronome practice. Usually it is recommended that you should start your metronome far lower than you might think, as low as 50-60 bpm. By starting at a tempo this slow, you are forced to thoroughly understanding the rhythmic placement of each note in relation to the beat of the metronome. It is important to note that reducing the tempo much below 50-60bpm is not recommended. Slower than this makes it extremely difficult to keep time due to long pauses between each beat.
Take Small Steps
Once you are able to play the song fluently at a very low tempo, you can start to increase it. This increase should be very small. You should only ever increase the tempo by 1-5bpm at a time. By making small changes like this, the increase in speed is barely noticeable, and you will be able to adapt to it more quickly and accurately. It may seem tempting to increase by 10-20bpm, but you will likely end up struggling to play accurately with that big of a change and have to reduce the tempo again anyway resulting in lost time, and developing bad habits/mistakes.
Be Accurate
It is extremely important while using a metronome to be as accurate as possible. Small mistakes at a slow tempo will become large mistakes at a fast tempo. To maintain accuracy you should never increase the speed until you can play a section perfectly at least 3 times in a row. You should be able to play at the current tempo relatively effortlessly before increasing the tempo.
Tips For When You Get Stuck
With almost anything you learn, you will inevitably encounter a tempo that you struggle to get past. E.g you are learning a technical shred solo and can’t quite get the last 15 bpm you need. Here’s some tricks to gain that last bit of speed.
Temporarily boost the speed to far beyond what your capable (e.g. full tempo of the song) and attempt to keep up with it a handful of times before reducing the speed again. When you reduce the speed back to where you started, it will feel relatively very slow and more achievable. Use this trick sparingly as using it too much will result in sloppy playing.
Don’t be afraid to take a break if your struggling. Go for a quick walk, watch tv for half an hour, come back the next day. Whatever you need to do to clear your head and try again.
Try breaking the practice up into small concentrated chunks. Try spending just 10 minutes of heavy focus on the part you’re stuck on, then do something else for 20. Come back and do another 10 minutes and repeat. You will find these small blocks of intense focus will yield better results than if you tried to bash away at it for hours on end.
Drop the tempo back down and check for any small mistakes. Sometimes we can get stuck at a speed because we have progressed to fast and started making mistakes.
Practice Songs You Already Know With Metronome
The metronome isn’t just for learning new songs. It’s also a fantastic tool for keeping on top of what we have already learnt, particularly for technically challenging songs. You will find that even in songs you have know for years, sitting down with a metronome and practicing it slowly for a few minutes will dramatically improve how accurately you can play it..
Where Do You Get A Metronome
Luckily for you, you will already have access to a metronome through either a computer or mobile phone. Google has a built in free metronome app, all you have to do is search “metronome”. For practice that requires non-standard time signatures and subdivisions, there are many great mobile apps that offer these features for free. So there’s no excuse for not using one.
So next time you sit down to practise with a metronome, try using these tips to maximise your practice time. The better you are at using a metronome, the less time you’ll have to spend using it. You’ll become a much cleaner, more accurate and faster guitarist for it.
Interested in guitar lessons? We’d love to help! Get in touch today.
[button label=”Book your FREE LESSON” url=”https://guitargym.com.au/request-a-free-lesson” color=”#e21836″ target=”_self”]
It’s almost rehearsal time for The Guitar Gym and Sono Music Performance Showcase. The organised rehearsal is an amazing opportunity to meet the rest of your band and practice playing your song in a full band context. This can be a daunting time, between meeting your bandmates for the first time and for some of you, playing your song in front of others. To make sure that you make the best out of this fantastic opportunity, follow the steps of this guide.
Know your song
Getting the most out of your rehearsal begins long before you even enter the rehearsal room. Rehearsals are for working out how playing in a band works – they are not for learning to play the song. Band members learning the song during the rehearsal wastes everyone’s time and will eat into time that could be better spent playing the song together. It is also of no use to you if you spend the whole time learning the song instead of practicing playing together. Even if you feel that you know the song pretty well, run through it at least once a day so that you can focus completely on working with the band.
Be early
You still haven’t even entered the rehearsal room, but nothing wastes rehearsal time like a late arrival. The more time you get to play the song with your band, the more beneficial the rehearsal will be. Don’t waste your rehearsal time on something as inconsequential as tardiness. Being early also might give you a chance to meet some of your bandmates before you get into the room. Lateness will hold up your band while they wait for you to arrive, then wait for you to get ready.
Get ready quickly
Once you’re in the room, try to find the equipment that you need as quickly as possible and get yourself ready to play as soon as you can. Get your instrument out, get it plugged in if need be, and check your volume as best as you can without annoying everyone. This includes tuning your guitar! Setting up quickly means you can get to playing the song sooner, as and also shows the rehearsal host how quickly you can organise yourselves. If you prove yourselves to be quick and efficient, then they may let you play a bit later into the session before telling you to pack up again.
Come join us for our 2018 Performance Showcase!
Follow directions
A Guitar Gym or Sono Music host will be directing your rehearsal. They will be a seasoned performer with decades of experience in rehearsing bands for the stage. They know what they are talking about, and will help you to get some serious results from your rehearsal – provided that you listen to them.
Play the song as many times as you can
You don’t have a lot of time in the rehearsal room, so try to get through the song as many times as you can. Don’t spend time talking between each time unless you have a specific issue to work out. Every minute that you spend not playing is one minute less out of your rehearsal time that could be spent working on getting your band as tight as possible for the concert.
Ask questions
If you’ve got a question about how something works within the band, ask in between plays. If it’s confused you, then there’s a good chance that it’s confused someone else as well. The answering of the question will be probably help the whole band understand the song better. That said, save questions about your specific part for your lesson.
Be respectful
Don’t laugh at people for getting things wrong or for asking what you think is a silly question. Everyone will be at different stages in their musical career, and the last thing that anyone needs is grief from their bandmates. You’re in this together, so support each other and the whole thing will be more fun for everyone.
Pack up quickly and efficiently
Once your host has called the rehearsal to an end, pack up as quickly as you can to make room for the next band. If you’re packed up early, you might get a chance to ask more questions of either your host or your bandmates.
Debrief with your teacher
At your next lesson, discuss how the rehearsal went with your teacher. They will be keen to know how it went, and you may have more questions that you didn’t think of during the rehearsal. There’s a good chance that you realised that there was something that you need to work on, and your lesson is a great time to do just that!
Follow these steps, and your rehearsal will an amazing experience that will give you a huge boost to both your ability and your confidence leading in to The Guitar Gym and Sono Music Performance Showcase. Make the most of this opportunity, and above all, have fun and rock out!
So you’ve registered for the concert and you’ve been placed in a band with other musos, and you’ve been given the song that you’re going to play on the day. Now all you have to do is learn the song! Easy enough, right? Just to keep the pressure off, let’s have a look at some ways that you can streamline how you go about learning your showcase song.
Don’t panic
Sounds pretty easy, right? Now that you’ve got a deadline, it can be easy to get yourself stressed out if your song isn’t coming along as quickly as you might like. If you’re really stressing, just talk to your coach about it – they’ll be able to help you with some more strategies, or if it’s really necessary, to simplify your part. You’ll have opportunities to rehearse your song with the rest of your band, too, so you don’t need to worry about that.
Don’t waste time
While it’s important not to get stressed out, it’s also very important that you don’t become complacent. Even though you have several weeks, that’s no reason not to start practicing diligently right now. By wasting time and putting off the hard work on your concert song, you’re only setting yourself up for an unpleasant rush later on. The sooner you get the song sounding good, the sooner you can work on playing it with others and playing it on stage.
Know what you need to do
If your coach has already outlined exactly what you’re going to be playing, whether that’s chords, lead, or a combination, then make sure that you stick to that. There’s no point in spending time learning all the various parts of a song if you’ll only be playing one of them on the day. Focus on learning your part, and your part only. If you aren’t sure exactly what that is, then you should ask your coach at the start of your next lesson.
Memorise the song
You won’t be able to take a chord chart or anything similar on stage with you, so start weaning yourself off it as soon as you can. Look for patterns and repeated sections that will make it easier to remember without a visual aid. You’ll also find that harder sections are much easier to play when you don’t have to stop and look at the notation. Make sure to actively listen to the song as often as you can tolerate.
Make sure that you’re available for the upcoming rehearsals
UPDATE: Rehearsal schedule is here, please ensure you contact the office to confirm your attendance (or non attendance!) Try not to overbook the last few weekends before the concert. You will get the chance to run through your song with (hopefully) the entire band in the large group room at the Indooroopilly studio during one of the last weekends before the concert. It’s extremely useful and a great boost in your pre-show confidence to have had a rehearsal with all of your band members. The rehearsal is a great way to get a taste for what it’s going to sound like with your bandmates, and also is a great way to find out what you need to work on for the last couple of weeks. You should make every effort to attend. Unfortunately due to the number of people involved we cannot meet requests to arrange special rehearsal times.
Rehearse more
There is another opportunity for some more rehearsal time that is somewhat unique to The Guitar Gym and Sono School of Music. In the week or two before the concert, we encourage performers to attend each other’s lessons to squeeze in some more time playing the song together before they have to do it in front of friends and family. If your coach hasn’t already discussed it with you, just let them know that you’re interested and they will let you know when to come in for some extra time with your bandmates. For adult players, any rehearsal is a good opportunity to swap contact details with your band mates and organise some out-of-hours rehearsals at home. We have had several groups do this in the past, and it always leads to a well-rehearsed performance on concert day. Our band room is also available for you to use at no cost, but be sure to book through the office.
You’ve got several weeks to get your song to a good standard before you perform it in front of other students and family members, but don’t let that fool you – you’ve got work to do, and no reason not to start on it right away. The last thing that you need when you’re about to go on stage is the worry that you haven’t done everything that you could have done to be ready for the performance. If you’ve done everything on this list in addition to plenty of practice, then you will have done pretty much everything in your power to be ready to play your song at The Guitar Gym and Sono Music Performance Showcase.
If you need some tips for maximising the effectiveness of your practice, make sure to check out our other articles:
In Part II of our Essential Metal Guitar Licks series, Ryan shows you some cool string skipping licks to add to your lick library. You can play these together with the licks in Part I. Enjoy!
If you’d like to request a particular metal style lesson video, please contact us.
For all you aspiring metal guitarists out there, our resident metal man Ryan has some essential metal guitar licks for you in our Essential Metal Licks series. We hope you enjoy our first video, and be sure to tune back in for more in this series. If you’d like to request a particular metal style lesson video, please contact us.